Now that the work I was doing on even numbered braids is completed (without all the possible variations, that is), I turned my attention to the odd numbered braids. I discovered something quite astonishing, as a matter of fact. They’re all the same! Not the same as the even numbered braids – that’s an entirely different animal altogether, as you’ll have discovered if you’ve gotten my ebook. They’re all the same as in they are all lattices! Starting from the 3-strand braid, all the way up to any number you can think of (as long as it’s odd), these braids are all lattices. This means they create a weave that looks just like the top of your favorite pie, or wicker basket, or chain link fence. I should have realized it before, but it didn’t hit me until I started charting them to work out the math behind them. I found out that they all have a 12 row repeat, and have a multiple of 4 for the number of stitches in the pattern. You could do a tighter version in 8 rows, keeping it in line with the even numbered braids, but I like the relaxed look of the 12 row version.
To show what I mean, here is a charted representation of the 3, 5 (Celtic Princess), 7, and 9 strand lattice. You will notice that they just get wider and the repeat is still only 8 rows. I have repeated the 3 strand one twice to show the lattice better.

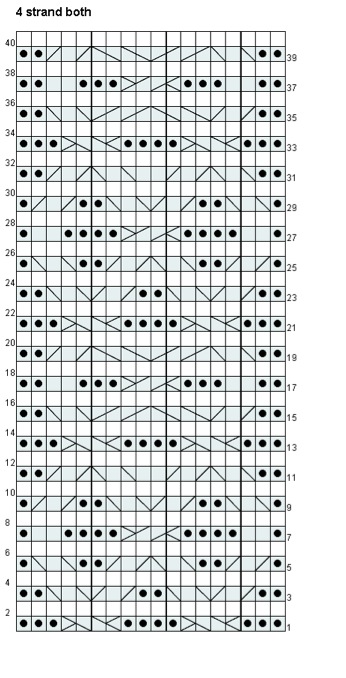
From top to bottom - the 3, 5, 7, and 9 strand lattice
Just like with the braids, there are lots of variations you could make to the lattices. For one, you could continually decrease the number of strands as you go up your work (or down), to give a pyramidal effect. You could start in a rib and work lattices in patches over the work. I think one of the most versatile uses for a lattice would be in edging. The 3 and 5 strand ones would be really good for this due to their size. Because of the odd number of strands, you have an alternating edge pattern. It alternates between knit “strands” and purled “background” stitches. The pattern for the lattice is remarkably simple, because you start with the basic pattern and then just add stitches as you go. A larger lattice panel is great as the main focus of a sweater – just like the one I’m wearing on the HUGZZZ page of this site. I can’t tell you how many comments I’ve gotten about that sweater, and it’s because of the simple lattice panel in the middle. It really is simple, but time consuming to knit as it has 19 strands. Once you get the hang of it though, they come along pretty quickly. Here’s the pattern in text form for the 7 -strand lattice.
12 Row version 8 Row version
Row 1: k2, (p4, C4F) 3x, p2 Row 1: k2, (p4, C4F) 3x, p2
Row 3: (T3F, p2, T3B)3x, T3F, p1 Row 3: (T4F, T4B)3x, T4F
Row 5: p1, (T3F, T3B, p2) 3x, T3F Row 5: p2, (C4B, p4)3x, k2
Row 7: p2, (C4B, p4)3x, k2 Row 7: (T4B, T4F) 3x, T4B
Row 9: p1, (T3B, T3F, p2) 3x, T3B
Row 11: (T3B, p2, T3F) 3x, T3B, p1
If you need more strands (multiples of 2), you just have to add 8 stitches per 2 strand increment on your foundation row (p2, C4F – or C4B – , p2) and work them in your pattern.

Here is a picture of the 3 strand lattice. It would make a great edging and its mirror could edge the other side.
Hugzzz 😎